Why Clipping is Such a Useful Tool for Mixing Snare Drums
The snare drum is one of the most important elements in any drummer’s kit. It provides the backbeat that drives the rhythm of the song and can be used to punctuate important moments in the music. Because of that, it’s important to get the snare sound just right.
When it comes to mixing snare drums, clipping can be your best friend.
Clipping is the process of applying digital distortion to audio in order to increase its level beyond what the original recording was capped at. This might seem like a bad thing, but when done right, clipping can actually make snare drums sound fuller and more present in a mix.
The Reason Clipping Works:
One of the biggest challenges when mixing snare drums is getting them to cut through the mix without sounding harsh or over-compressed. Clipping can help with this by adding harmonic distortion to the signal. Harmonic distortion essentially means that new frequencies are being generated that weren’t present in the original signal. These new frequencies can help fill out the sound of the snare and make it sit better in the mix without sounding thin or tinny.
Of course, you don’t want to overdo it with clipping—too much distortion will just sound nasty. A good rule of thumb is to start with just a little bit of clipping and then gradually increase the amount until you start to hear some harmonic distortion being added to the sound. At that point, back off slightly until you’re happy with the results.
Another benefit of clipping is that it can help add some subtle sustain to snare drums. This can be especially useful if you’re working with samples that were recorded dry and don’t have a lot of natural resonance. A touch of clipping can go a long way towards making samples sound more realistic and organic.
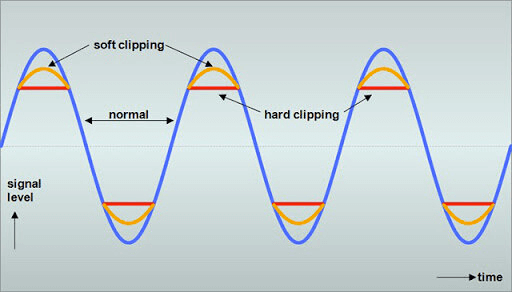
Soft Clipping Plugins Vs Hard Clipping:
When it comes to clipping, there are two main types of distortion that you can use: soft clipping and hard clipping. Soft clipping is the more subtle of the two and involves adding just a touch of distortion in order to increase the level of the signal. Hard clipping, on the other hand, involves much more aggressive distortion and can result in a lot of added noise.
Which type of clipping you use is largely a matter of personal preference. Some engineers prefer a cleaner, more transparent sound and will only use soft clipping, while others like a more aggressive sound and will rely on hard clipping to add more distortion. Ultimately, it’s up to you to decide what sounds best for your mix.
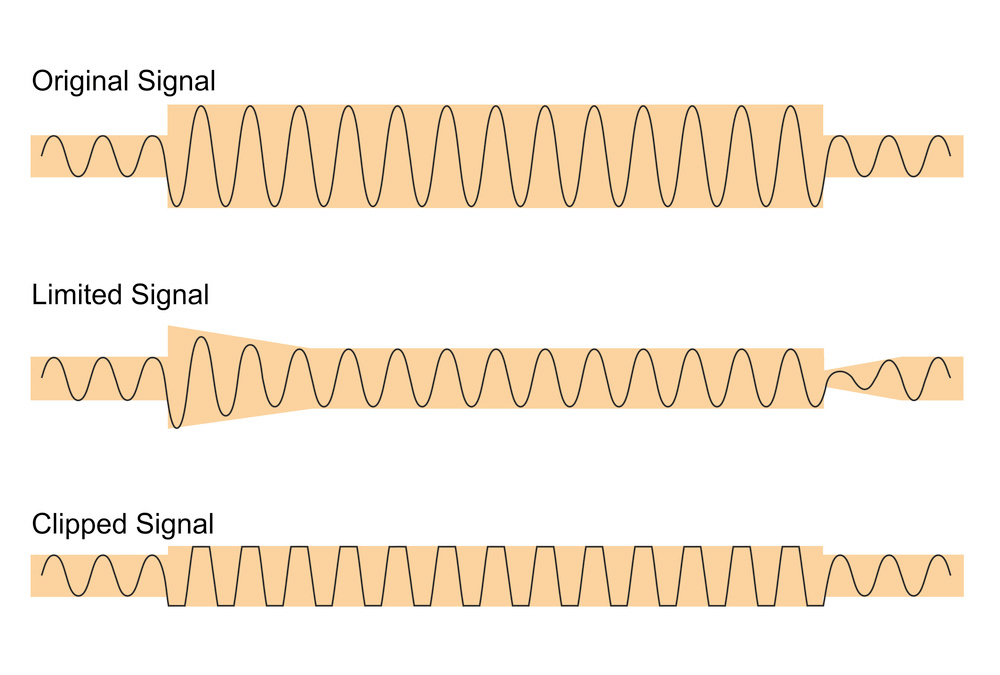
Clipping vs Limiting
It’s important to note that clipping and limiting are not the same thing. Limiting is a form of dynamic compression that is used to prevent audio signals from exceeding a certain level. Clipping, on the other hand, is a form of distortion that occurs when an audio signal is pushed beyond its maximum level.
While both clipping and limiting can be used to increase the level of snare drums in a mix, they will produce very different results. Clipping will add harmonic distortion to the signal, while limiting will simply compress the dynamics. Which one you use is entirely up to you and will depend on the sound you’re going for.
The Top 3 Clipping Plugins To Use:
Though there are a lot of different clipping plugins out there, some of my favorite to use are:
1. JST Clip
2. T-Racks Clipper
3. Boz Labs Big Clipper
Each of these plugins makes the process of clipping drums extremely easy. Plus, you can easily adjust the amount of clipping so that you can dial in the right sound for your tastes.

Conclusion:
Clipping may not be something you think about often when mixing, but it’s definitely a tool worth considering next time you’re trying to get your snare drums to sit right in the mix. It can add some much-needed fullness and resonance, provided you use it judiciously!
Have you ever tried using clipping on your snare drums? Let us know how it went in the comments below.
Struggling to get your drum mixes sounding pro?
Inside of the Master Your Drums coaching program, you’ll learn a simple, repeatable process for mixing your drums to a pro-level within the next 30 days.
You’ll get discover how to give your drums clarity, punch, and impact so that they never feel weak or get lost in a mix.
Want to learn more? Click here for the details